

Before we begin, I would like to thank Astrolab-Agency for the Internship opportunity and for their trust in me to make this project, I would like to thank Mr Mahdi Ben Chikh for his precious support along the intern period.
What is Rust ?
Rust is a programming language ( general purpose) C-like, which means it is a compiled language and it comes with new strong features in managing memory and more. The cool thing! rust does not have a garbage collector and that is awesome 😅 .
What is DevOps ?
In short, DevOps is the key feature that helps the dev team and the ops team to be friends 😃 without work conflicts, It is the ART of automation. It increases the velocity of delivering better software!
Identifying the problem
we can make a lot of things with rust like web apps, system drivers, and much more but there is one problem which is the time that rust takes to make a binary by downloading dependencies and compile them.
The cargo command helps us to download packages ( crates in the rust world), The Rustc is our compiler. Now we need to make a pipeline using the Gitlab CI/CD and docker to make the deployment faster.
This is our challenge and the Goal of this article! 👊
Static linking Vs Dynamic linking
Rust by default uses a Dynamic linking method to build the binary, so what is dynamic linking ?.
The Dynamic linking uses shared libraries, so the lib is loaded into the memory and only the address is integrated into the binary. In this case, the libc is used.
The Static linking uses static libraries that are integrated physically into the binary, no addresses are used and the binary size will be bigger. In this case, the musl libc is used.
You want to know more ? Then check this : click here.
Optimizing the CI/CD pipeline
The CI/CD pipeline is a set of steps that allow us to make :
build → test → deploy
In this article, I will focus on the build stage because in my opinion it is a very sensitive phase and it will affect the “Time to market” approach!
So the first thing is to optimize the size of our docker images to make the deployment faster. Before we begin, I will use a simple rust project for the demo.


The project structure
let’s understand the project structure :
- src : This dir contains all source code of the app (*.rs files).
- Cargo.toml: This file contains the package meta-data and the dependencies required by the app and some other features ….
- Cargo.lock : Ct contains the exact information about your dependencies.
- Rocket.toml: With this file, we specify the app status ( development, staging, or production) and the required configuration for each mode, for example, the port configuration for each environment.
- Dockerfile: This is the docker file configuration to build the image with the specific environment that is configured already in Rocket.toml.
Are you prepared 👊 😈 !!! , let’s begin the show !! 🎉 🎉 🎉
We will begin by building the app image locally, so let’s see how the docker file looks like :
This Dockerfile is split into two sections :
- The builder section ( a temporary container)
- The final image (Reduced in size)
The builder section:
In order to use rust, we have to get pre-configured images that contain the Rustc compiler and the Cargo tool. the image has the rust nightly build version and this is a real challenge because it’s not stable 😠.
We will use the static linking to get a fully functional binary that doesn’t need any shared libraries from the host image !!
let’s breakdown the code :
- First we import the base image.
- We need the MUSL support:
musl-toolafter updating the source.list of your packagesapt-get update, MUSL is an easy-to-deploy static and minimal dynamically linked programs. - Now we have to specify the target if you don’t know! no problem! you can use
x86_64-unknown-Linux-musl, run with Rustup (the rust toolchain installer) - To define the project structure on the container we use
cargo new --bin material(material is the project name), it’s much like the structure that we see earlier. - Making the
materialdirectory as a default we use theWORKDIRDockerfile command. - The
Cargo.tomlandCargo.lockare required for deps. installation - Setting up the
RUST_FLAGSwith-Clinker=musl-GCC: this flag tells cargo to use the musl GCC to compile the source code, the--releaseargument is used to prepare the code for a release ( final binary optimization). --targetspecify the target compilation 64 or 32 bit--feature vendoredthis command is an angle 😄 ! it helps to solve any SSL problem by finding the SSL resources automatically without specifying the SSL lib directory and the SSL include directory. It saves me a lot of time, this command is associated with some configurations in the Cargo.toml file under thefeaturesection.
Until now we only build the dependencies in Cargo.toml and we make the clean ( removing unnecessary files)
- After downloading and compiling required packages, it’s time to get the source code into the container and make the final build to produce the final binary ( standalone).
The builder stage has complete! congrats 😙 🎉 yeah !!. Now let’s use alpine as a base image to get the binary from the build stage, but! wait for a second ! what is alpine ???
Alpine is a Linux distribution, it’s characterized in the docker world by its size! it is a very small image (4MB) and it contains only the base commands (busybox)
--from=cargo-build ..../materialnow we will copy the final binary to the alpine and the intermediate container (cargo-build) will be destroyed and we get as a result a very tiny image (12–20MB) ready to use 😃 😃 😃
You know how to build a docker image right 😲 ? okay 😃
The CI/CD pipeline
After testing the image locally, it seems good 😃, we resolve the docker image size, but in the CI system the velocity is very important than size !! so let’s take this challenge and reduce the compilation time of this rust project !!
let’s look at the .gitlab-ci.yml file ( _our CI confi_guration):
There is a tip in this file, I just split the docker file into two stages in this .gitlab-ci.yml :
- The builder stage (rustdocker/rust..)→ build dependencies and binary
- The final stage (Alpine) → the build stage
For the CI work, I prepared a ready-to-use Docker image that contains all I need to make a reliable and fast pipeline for the rust project, this image is hosted in my docker hub .
hatembt/rust-ci:latest
This image contains the following packages installed and configured :
- The
sccachecommand: this command caches the compiled dependencies! so by making this action to our build we can compile deps only one time !! 😅 , and we gained much more time. - The
cargo-audit: it’s a helpful command lets us to scan dependencies security.
Let’s breakdown the code and understand what’s going on !!
In the first job : _prepare_deps_forcargo we need our base image hatembt/rust-ci .
In this job some setting are required to make a successful build are placed in the before_script:
- Defining the cargo home in the path variable.
- Defining the cache directory that s generated by
sccache(it contains the compilation cache ). - Adding cargo and rustup ( tey are under .cargo/bin) in the path.
- Specifying the
RUSTC_WRAPPERvariable in order to use thesccachecommand with the rustc or MUSL in our case.
Now all thing are ready! so let’s make the build in the script section, you are already now what we should do 😃 , let’s skip it 👇.
The cache and artifacts sections are very important ! its saves the data under :
- .cargo/
- .cache/sccache
- target/x86_64-unknown-linux-musl/release/material (this is our final binary ).
To know more about caching and artifacts flow this link.
All data that is created in the first run of the CI jobs will be now saved and uploaded to the Gitlab coordinator. On the next build (new codes are pushed), we will not start the build from scratch, we just build the new packages, the old data will be injected with <<:*caching_rust after the image keyword.
let’s move on to the next JOB: build_docker_image:
I made a new Dockerfile for the docker build stage, it’s based on the alpine image and it contains only the binary from the previous stage.
The new Dockerfile:
First, we need a docker in docker image (dind) → to get the docker command and let’s take the steps below:
- login to the Gitlab registry
- Build the image with the new Dockerfile
- Push the image to Gitlab registry
and Now the results! 😧
The image size is :

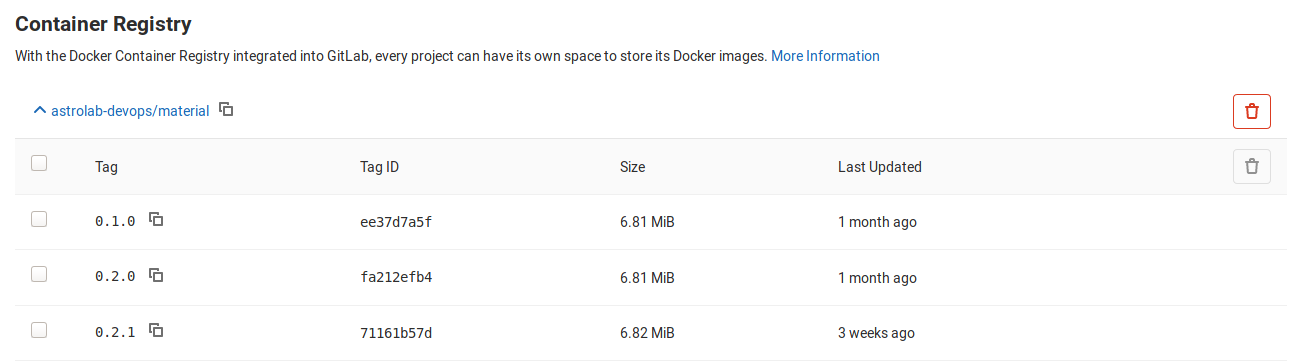
image size
The CI Time:

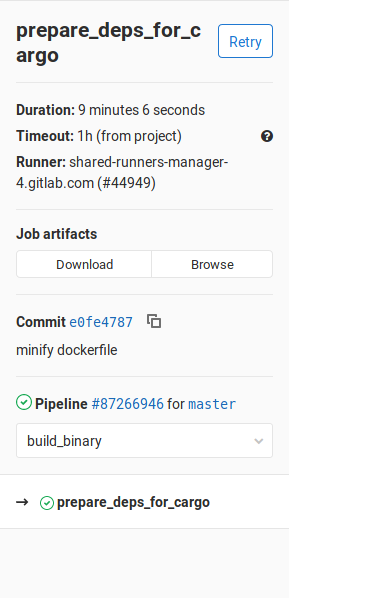
NB: the time is for the whole build time, the built binary and docker_build stages
This is the power of DevOps, the art of automation with some philosophy in the configurations, and the steps to flow we can make even better than these results.
In business the velocity, the quality, and the necessary features (on the application) are very important to Bring the company to high levels of success → this is the successful Digital transformation.
Finally, I hope that this Story helps you to move on to the next steps in the CI/CD systems, you can apply these ideas into any language (mostly compiled languages, but still the same steps). If you have any feedback or critiques, please feel free to share them with me. If this walkthrough helped you, please like 👏 the article and connect with me on LinkedIn.